Sunday, 7 August 2016

INSTALLATION OF AN SPIT AIR CONDITIONER PART 2
following up from part 1 of this installation guild, here the other steps that complete the process.

  1. The outdoor unit's location needs to be away from any heavy trafficked, dusty or hot areas.
  2. The outdoor unit needs to be 12" of space surrounding its perimeter to ensure proper functioning.
  3. Remove the cover.
  4. Refer to the unit's wiring diagram and make sure the cable wires are connected as the diagram suggest. 
  5. Fasten the cable with a cable clamp and replace the cover.
  6. Remove the caps from the 2 - way and 3 - way valves and from the service port.
  7. Connect a vacuum pump hose to the service port.
  8. Turn the vacuum on until it reaches an absolute vacuumof 10 mm Hg.
  9. Close the low pressure knob and then turn off the vacuum.
  10. Make sure you test all the valves and joints for leaks.
  11. Disconnect the vacuum . Replace the service port and caps.
  12. Affix the piping to the wall with clamps.
  13. Seal up the hole in the wall using expanding polyurethane foam.
And you have completed an installation of a spit Air conditioner. Remember to put batteries into the remote and turn on.

Ther are different methods of installing an Air Conditioner Unit, but the author have found that these steps ensure a well functioning unit.

You should also note that some companies have warranty policy guild lines about installation. Notwithstanding you would have saved over $1,000.00 TT dollars and the intrusion of workmen in your space by do it yourself.

Stay tuned for more insightful TNTDIY Projects.

TNTDIY Stair design

The author will give a basic idea for a stair design. But I should be noted that this is best done by an expert.
These are things to look for of expectation of your design.
1.      The design details of the actual stair.
2.      The minimum width 3’-0”
3.      The allowable slope (the ratio of rise to go).
4.      The number of steps without a landing 9.
5.      The height and position of the handrails
6.      The balustrades.
7.      The head clearance above the stair.
The position of the stair. In compliance with fire regulations

    1.  There are minimum distances required to an exit stair
    2.  It has to be structural sound, which usually means a structural engineer's approval of the design.
    3.  The same as a door height, we use 80”
    4.   Try to arrange good lighting, High set windows or even a skylight.
    5.  You must be accurate with your calculations. 

     The author used the table below in getting get the number of riser he needed. It may not be exactly what you have to work with, but it is a good starting point.


RISER (R)
GOING (G)
SLOPE RELATIONSHIP = 2R+G


MAX
MIN
MAX
MIN
MAX
MIN
8”
5”
14
10
28”
22”


     The slope ratio of twice the RISE plus the GOING stops you from choosing a slope that is a bit extreme, like a maximum or minimum (G) and (R) together.

  1. Get the total rise. Either measure on site or off the plans. Let's say that we have a total height of 9’-6”.
  2. Looking at the table above I see that my choices of the rise lie between 5” and 8”.
  3. 5” is a very small rise.
  4. From experience, house stairs fall between the range of 7” to 8”, so get out a calculator and try them.
  5. 9’-6” /7” = 16. rises

Stay tuned for more details on stair design and don't forget to write and tell us all about your design.


INSTALLATION OF FLOOR TILES

This is a great DIY project and will give great satisfaction when completed.

Most of the online information is guild us on installation and best practices, but the blog today would take a different approach as most of our installation in Trinidad and Tobago is done on concrete flooring. The author bad experience with hiring a contractor to install tiles in 900 Sq. floor Apartment, motivated him to write this blog. Moreover to undertake the next project.
 Finishes like this is what the author was promist, instead he got this.

Even if he didn't pay the contractor for the job, the cost of the materials will be lost, and the cost of remoing and re - installing the new tiles. Unless look at his legal options.


My Advise to you bloggers is do it yourself. follow the step in
 http://www.homedepot.com/c/ceramic_porcelain_tile_HT_PG_FL

And you can have this

# great tile job. Write and tell us your about your tiling experences.
GREAT TOWNHOUSE LOCATION IN CHAGUANAS

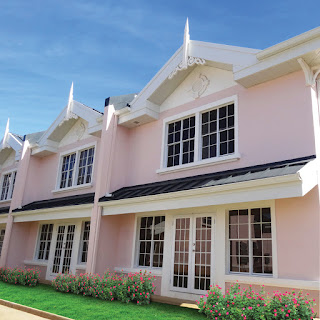
Just off the highway in an up and coming area. The West mooring of the central is Brentwood Court. It’s gated easy access to all the amenities. Medical Associates, Malls and restaurants.


There three bedroom units at approximately 1,500 Sq Ft floor area priced at 2,200.000.00 it’s a good buy. And the best time to buy in to the project is now, as the housing market has slowed down

I’m not a fan of the Pink but the fittings, windows and doors and the flooring are of impeccable standards. The author believes that this is the best but in Central after seeing all other option on the market.  

Write and tell me what you think about it # great house


INSTALLATION OF A SPIT AIR CONDITION UNIT


Most homeowners hire a professional to install a spit system air conditioner, most times from thesupplier. But if you are experienced with plumbing and electrical work, you can do it yourself.


Here are some important tips before you get started.

Sizing
  1. It is important to size the room as to avoid any over freezing of the unit or under cooling of the room. E.G. Area of the room multiply by 60 generally will give you the BTU required therefore a room 14' X 16' X 60 = 13,440 BTU.
  2. Also consider the use of the room and the amount of sun light or heat entering the room.E.G. Bedroom with two persons and one window area 24 Sq. Ft. Add 600 BTU, for each person occuupying the space and 400 BTU for each window. 
  3. Therefore 13,440 + 1,200 + 400 = 15,040 BTU, You can decrease the BTU reting by 10 % if room is on the shaded side of the house, or increase by 10 % for the sunny side. And you should always use the next size up, in this case it's a 18,000 BTU.

INSTALLING

  1. Avoid direct sunlight and heat sources.
  2. Avoid locations where gas may leak or where oil mist or sulphur exists.
  3. The indoor unit requires at lease 6" of open space surrounding its top and sides. The unit should also be mounred at lease 7' above antenna, power or connecting lines that are used for television, radio, home security systems and telephones. The electrical noise from these sources could cause operational problems for the air conditioner.
  4. Hold the mounted plate against the wall where you intend to install the evaporator (indoor Part of the unit)
  5. Using a level make sure the plate is both horizontally and vertically level.
  6. Drill holes into the wall at the appropriate spots to affix the plate to the wall.
  7. Find the best location for the hole to the exterior based on the opening in the mounting brecket. 

  1. You should also consider the lenght of the pipe and the distance that it needs to travel to reach the outside part of the system. This is important because you may need to resize the piping lines.
  2. Drill a hole that is 3" in diameter through the wall. The hole should slope downwards towards the exterior to ensure a dequate drainage.
  3. Insert a flexible flange into the hole.
  4. Lift the unit's front panel and remove the cover.
  5. Be sure the cable wires are connected to the screw terminals. Also, make sure that they match the diagram that came unit the unit.

  1. Run the piping from the indoor unit towards the hole drilled through the wall. Minimize bending to ensure optimum performance of the unit.
  2. Cut a lenght of 2" P.V. C pipe 1/4" shorter than the lenght between the interior wall surfaces.
  3. Place the pipe cap on the interior end of the P.V.C pipe. Insert the pipe into the hole in the wall.
  4. Bind the copper pipes, the power cable and the drain pipe together with the electrical tape . Place the drain pipe to the indoor unit .Use 2 wrenches , working in opposite directions, to tighten the connections.
  5. Join the water drainage pipe to the outdoor unit's base.
  6. Run the bound pipes and cables throught the hole in the wall. Make sure that the drainage pipe allows water to drain in an appropriate place.
     

For the tips and the rest of this installation instruction please stay tuned for the author follow up post. And don't forget to write and let us know you DIY projects.


Thursday, 4 August 2016

UP AND COMING DEVELOPMENT TO LOOK AT

There are two nice developments the author found in east Trinidad
1.      Acono Garden in the Maracas Valley it’s on the hill with a great view, looking out into the valley it’s gated and a fair price. You can still get a lot for under $600,000.00


1.      Still in the Maracas Valley With the best view in the East is Elizabeth Gardens.
With Prices starting at $1,000,000.00 Land only and Town houses at 1,800,000.00 this still is a catch if you can afford to buy now.


1.      The most affordable find is in Arima, Phase 4 of Bregun Park Still under $500,000.00

Just land and the view was as spectacular as Elizabeth Gardens or relaxing as Maracas Valley, But the price is really a find.
Sorry no picture as yet but I’m sure you guys are going to find it . Please post your pictures 

Designing in small spaces Part 2

Man Cave 

In this post the author will be exploring a couple options for a cost effective man cave.
Before designing of consulting your designer, these are a couple things you should know.
o   How much space do I have ?
o   Is it going to be private ?
o   What is the theme ?
o   Would my concept be an issue for the rest of the family?
o   How much money I have to spend on this project?
o   Is there going to have a Bar?
o   What kind of furniture is there going to be?
There are lots more questions than answers, it depends on the person
Here are some ideas for your Trini style Man Cave

Remember guys its your cave that your wife allow you to have ...


Lighting and entertainment are two of the more important things in a man cave, therefore a large portion of your budget should be allocated.


 I found a wonderful laminate floor tile that really looks like wood and there are options.
Lighting and entertainment are two of the more important things in a man cave, therefore a large portion of your budget should be allocated.
Write and send pictures of your Man Cave and Win a lime for you and your guys sponced by the best beer the the world Carib..


Wednesday, 3 August 2016

Designing in small spaces Part 1

Today we are discussing the Foyer. Before you discuss with your architect, you should conceptualize the layout and functions for the space. 
·         The Point of entry –The main point of entering the room, “you only have one chance to make a first impression”. Imagine what your guest and family will see and experience on entering the room. This area is called the Foyer. While person may argue that it’s a waste of space and dated. This room certainly sets the mood of the house and what to come.


These are just a couple foyer ideas that may interest you, or a good starting point for discussion.
Please write and discuss some of your ideas.


·          

Monday, 11 July 2016


ELECTRICAL INSTALLATION OF A STANDBY GENERATOR

Today's blog we will discuss the installation of a standby Generator. 

While some people may argue for or against Generators, Trinindad and Tobago has a reliable supply of electricity, and there may not be a need to invest in standby power. But for those who see the need for a generator, the author has some tips, which will clear up all misconceptions on the process.

In Trinidad and Tobago there are laws governing  the  installation of generators.  The installation must be carried out by a certified electrician. Notwithstanding, you can observe and give guidance regarding the installation. or what is required in the case of a power outage and the functionality of the unit.


Here are some important facts you should know when installing a Standby Generator.
  •  A generator is designed to supply standby power only.
  •  A Generator is designed to supply a particular load    requirement.
  • The regulatory body  by law states, that any power generating system connected to the main grid via a structure or otherwise must be governed by an automatic transfer switch device as to prevent feedback onto T & TEC power lines.
  • Generators have three options in fuel requirements - gasoline, desoline and compress gas (Propane). 
  • Maintain the safety distance from fuel to generator and from house. (For more infomation on this, consult regulatory authority, Gas company) 
  • Maintain the safety required distance and other requirements for transfer switch. .(Consult regulatory authority, T & TEC).
  • Some Generators have a standard exercise date and time, which should be scheduled at least once a week at a time when the home owner can hear and document any variation.
   These are just some of the basic guidelines you should follow in installing your standby generator. Remember to consult a professional and to write and tell us your experience.


INSTALLATION OF A STEEL WINDOW

Steel windows are one of the most common windows installed in Trinidad mainly because of its safety records. But not all steel windows would provide the security and elegence which the home owner demands.

The basic tools required for carrying out the installation of a standard size Metpro Steel window are listed in table below.
Note:
·         The most common method of installing Steel Windows is within wrought openings.
a
Measuring tape.
Required for verifying window and opening sizes
b
Spirit Level.
Required for positioning window and levelling the window on all the axes X,Y & Z
c
Trowel, chipping & Claw Hammer etc.
Masonry tools required for brick laying, plastering and fixing window into opening
d
1”X 3”wooden lath, Concrete nails & Tie wire.
Used along with tie wire for bracing and battening window to wall while mortar or concrete cure.
e
Broom & rages etc.
Required for the removal of excess mortar, concrete, rubble and paint from window and surrounding area of opening.
f
Float or Rendering device.
Used in the rendering (plastering) wall after window has been fixed into opening. 
g
1”Paint brush
Used in the paining of window.
h
Putty Knife
Used in glazing window (installation of glass into window frame)


1.      Verify window schedule ( Ensuring all windows have their destination )
2.      Measure rough opening.
3.      Dimensions of all windows and rough openings with required tolerance.

Note:
·         This process is base installation of one window.
·         Metpro Classic Standard Steel Window is manufactured modular in design, starting from 11 ½” (292.1 mm) to 5’(1524 mm) in height by 24 ¾” (628.65 ) in length.
·         Metpro Classic Steel Window can be coupled both horizontally and vertically, in order to achieve any architectural design.
·         Metpro Classic Steel Window also has a range of Standard arches and fixed that can be coupled to enhance the appearance of the project.

1.      This task should be undertaken by a certified Mason and a helper.
2.      Ensure the masonry opening is a minimum of 2” larger than the window size.


Painting
3.      Window should be painted before installation with two coats of oil paint.
4.      After paint dries, position the window within the opening using the helper’s assistance.

Fitting                                           
5.      Position window within opening using tie wire and 1”X 3” wooden lath or a suitable battening material.
6.      Secure window in place levelling on all three axes X, Y & Z.             
 Securing
7.      The Mason or helper using mixture ratio one (1) part Cement to two (2) or three (3) Sharp Sand, adds water resulting in a damp mixture.       
8.      Fill in the spaces between the window crabs (anchoring device) and the rough opening with prepared mortar mix.
9.      Ensure the window is levelled and plump on three axes, A, B & C, before mortar hardens, then commence the final filling in the space around window with mortar mix.
10.  Clean off all extra mortar from the window and the surrounding areas.
11.  Plastering or rendering should commence after the mortar hardens.
12.  The Mason or helper using mixture ratio one (1) part Cement to two (2) or three (3) plastering Sand, adds water resulting in a damp mixture.
13.  Remove and disposal of all waste from the surroundings.
14.  Once the newly plastered wall surrounding the window dries and hardens, the glazing can commence.


Glazing
15.  Recommended glass thickness should be 5/32”or 4 mm. METPRO supplies glass cut to fit all of their windows.
16.  The installation of the glass should be attempted by a trained window glazer ensuring a neat and seamless glazing.
17.  Steel Putty is the most common material used for this application along with silicon.
a.       Clean window with damp cloth removing all excess dust and mortar.
b.      Apply silicon to slot where glass has to be inserted.
c.       Position glass into frame. Use window and door Silicon to hold the glass in place until putty is inserted.
d.      Place a batch of putty onto the glass near the frame.
e.        Using a putty knife smooth putty securing and fixing glass in frame.
f.       Clean glass with damp cloth and fingers removing all excess putty. 
g.      Final Painting of the window and putty should be done after three days allowing the putty to dry. 

18.  The window is then inspected by a main contractor to ensure customer satisfaction.
19.  If steel windows are properly installed and maintained, it is possible for them to last the life of the building. After the window is installed, verify that the window operates correctly. Handles stay and latches should be checked for proper operation and should move freely.
20.  Once the window operates satisfactorily, clean the window using a mild non-alkaline soap and warm water, applied with a sponge or soft cloth. Rinse with clean water.


About Me

My photo
Maracas Valley, St George, Trinidad & Tobago